Tuesday, January 22, 2019

The many versions of the JoJo.

The JoJo 
designed by Designer Stitch


Talk about the many different versions to the JoJo, oh my, and on sale for a limited time.


I've had the pleasure of testing the JoJo top and dress for Designer Stitch designs. I made two versions so far.

I am always on the hunt for patterns that include a turtle neck. I recently came back from a 10 day trip to Arizona. It was very cold and it snowed in Arizona, specifically in Seligman (route 66) . I came home still cold and looking for turtleneck garments, I had very few. When the JoJo test came up, I only saw the turtle neck version, lol. The JoJo comes in many different versions.

Shown above is the turtleneck and tunic length version, with long sleeves and cuffs. I made this version from a medium weight sweater knit fabric. Oh, and I do love stripes. I also chose to belt my JoJo. I paired my JoJo with the Alyse taper leg pant, also from Designer Stitch. http://designerstitch.com/?affiliates=12.


I like to accessorize when possible.

Shown in the pic below is another version of the JoJo, it's the dress, with a skirt sewn onto the top. This is made with a cotton lycra for the top portion and the lower portion of the JoJo is a metallic type stretch fabric. I did line the metallic fabric because it was a little thinner than I like. The JoJo is a simple sew and the instructions are beginner friendly. I plan on sewing many more in the near future.


For the dress version of the JoJo I wanted to sew the sleeves to look like an inspiration photo I saw of the sleeves, (love these sleeves), and with a turtleneck option. I cut the sleeve at the 3/4 length cut line and made a longer cuff to add to the sleeve, see pic below.


Different versions of the JoJo, shown below.


Thank you Ann Grose for another fun and on trend design.
This blog post has aff link, which helps to buy fabric to continue to test garments and sew. Thank you


Monday, January 21, 2019

GreenstyleCreations Power Sports Bra

The Greenstyle Power Sports Bra
My Sew-Along-Version


I signed up to follow along with the Greenstyle Power Sports Bra, which was a 4 day SAL. This was the first time sewing the Power Sports Bra. This blog is about some of the changes I made to have a comfortable fit for me. For more information on the pattern, click on the aff link.

Day 1, fabrics used: for the bra I used active wear fabric with good stretch and recovery, the lining I used the same fabric (with power mesh in between), and for the band I used a cotton lycra. For the straps I used swimsuit lining. I needed to use cotton lycra for the bra band as I am prone to itchiness, lol.


Day 2: Begin sewing the bra. I followed along with the pattern in sizing on under bust band and full bust cup, for what the pattern called for. Once my fabric was cut (exterior and lining), I felt the side was going to be smaller than I like. I like a little more side coverage so I re-cut the side front pattern piece, 5 sizes wider than my size.  I needed the side to be wider for my liking from my under bust to under my arm pit, It probably sounds like a lot, but it fit perfect.


Bra cups: I also added sew in bra cups because I want to use the bra as an everyday undergarment. I pinned bra cups to the inner lining and once I was satisfied with placement, I zig zaged in place and continued with pattern directions to finish. I will probably use different bra cups for my next Power Sports Bra, these I had on hand at the time.


Day 3, bra straps: I like my straps to be wider than normal. I cut my strap fabric 2" wide and the length according to the pattern pieces for the straps on the strappy back. I folded the longest side in half and sewed 3/8" seam and turned right side out once sewn. Because I did not have clear elastic (follow the pattern instructions), I used lingerie elastic that was 3/4" wide and threaded it through the sewn strap. Once my straps were finished, I followed the pattern instructions to add the straps to my bra. I used swimsuit lining for my strap fabric.


Day 4, bra band: Because I have issues with the bra band sitting at my rib cage, I had to widen the band by 5" more. I then continued to follow the pattern instructions, I also added a 4" wide elastic into my bra band.


Overall, with these changes made for my liking, I love my Power Sports Bra. I feel the cups gave me added lift, the straps gave me added support, and the band feels great, and comfortable too. The easiest way for me to put my Power Sports Bra on, is from the feet on up, best way for me.

Thank you so much Sarah Connell, for doing this sew along and the videos were so helpful. I was hesitant in buying the pattern, glad I did. Your videos for the SAL were very clear and easy to follow, any beginner-advanced or anyone who sews, can make the Power Sports Bra. 

Thank you Greenstyle Designs for another great bra. The Endurance bra is just as great too with the front zipper closure

This blog contains aff links.

Friday, January 18, 2019

The Sedona, shirt/dress.

The Sedona shirt and or dress
a pdf by Designer Stitch.


Before I begin, this picture was taken last year and today I have grey hair. Just so that you the reader won't be surprised when my next blog contains pictures of me transitioning to grey hair.

I had the privilege of testing the Sedona shirt/dress for Designer Stitch Designs. I chose to make the tunic length. I used rayon fabric, the contrast fabric is also rayon but from an old dress I tore up. I felt the contrast fabric went well with the main color. 

I found the pattern easy to follow along. I did need to alter the pattern by shortening the length. Being 5'3" tall, I find I need to shorten for most pdf patterns. The hardest part for me was finding a good placement for the front pockets, after a few tries, it worked out. 

Took a trip to San Jose's Kelly park for these pictures. Kelly park has great scenery at the Japanese Garden, a separate section of the park.


I styled my Sedona with a matching sash and also tried it with a black belt and jeans. I would normally wear this top with leggings as I am a leggings fan. But, I dropped/lost my leggings along the way to getting dressed, lol.


I also used the contrast fabric for the back yolk and inverted my back pleat, I like using inverted back pleats. 


Overall I am very pleased with the Sedona, the design is so in trend right now. The instructions are very well written and Ann also provides many tutorials for added help. The Sedona comes in different lengths, variations, and is intended for woven fabrics. For more information, click on the aff link.

Some details.


THANK YOU ANN GROSE FROM DESIGNER STITCH, FOR ANOTHER GREAT DESIGN.

This blog post contain aff link.

Saturday, September 22, 2018

Designer Stitch, Chelsea Cardigan

Chelsea Cardigan by
Designer Stitch


NEW PATTERN RELEASE: I have been so excited to share my new jacket/sweater. The Chelsea Cardigan shown above here in a hip jacket version and thigh versions. I say jacket because it's made from a stretch faux suede fabric, love it. I also made a mid thigh length sweater out of sweater knit fabric. Both sweater versions are paired with the Kristen dress, also from DS. For more information click on the Aff link, thank you. https://designerstitch.com/shop/chelsea-cardigan/?affiliates=12


For the sweater knit cardigan above, I made the thigh length with the tie belt. I also sewed the collar one side using the sewing machine, the other side by hand. I plan on using this cardigan as my everyday and make more in various colors.


 For the hip version shown above, I used a stretch faux suede, love them both. Both my versions are a great fit. The faux suede is for going out. Because the stretch faux suede was a little thicker fabric, I used the burrito method to sew the inside of the collar. I also add length to the tie belt to wrap around my wait 2x.

There is a sew-along in the Designer Stitch support group, which will also show how to bag or use the burrito method for the collar.
https://www.facebook.com/groups/1784136378491093/?ref=group_header


Click on the aff link to pick up your Chelsea Pdf and get ready for the Sew-Along. 
https://designerstitch.com/shop/chelsea-cardigan/?affiliates=12

I have worn the hip version out and received many compliments, I was even asked where did I purchase it. Anyone sewing up the Chelsea Cardi will fall in love the the style and fit, great design Ann Grose.


For more information, click on the aff link. Thank you
https://designerstitch.com/shop/chelsea-cardigan/?affiliates=12
The aff link helps me buy more fabric so that I can be able to test more designs, thank you.


Sunday, August 26, 2018

The Piper Tunic and Dress by Wardrobe by Me

Piper Tunic and Dress
by Wardrobe by Me

I love wearing Boho style dresses and tops. I especially enjoyed sewing the Wardrobe by Me, Piper Tunic and Dress, because it is fashioned from the boho style that I enjoy wearing.


The Piper Tunic and Dress comes in many different versions to choose from. I chose the dress shown above, I made the button up version for the sleeves and used rayon fabric. I also made the side slits. A simplistic boho style dress, easy to sew up, and instructions are well written.


For the Tunic length shown below, I really wanted to fashion it from the 80s-90s, with the fabric I used. I had this tie dye dress that was too big for me, so I cut it up for the Piper Tunic shown below. I didn't have enough fabric for the sleeves, but I managed to find a near matching tie dye fabric. I used the sleeves with the option to fold up with a button and the front with ties. I love how the tunic turned out. I paired my tunic with the Perfect Fitting pants, also from WBM.

For more information, click on the aff link.
https://wardrobebyme.com/?rfsn=388327.5a8a7


Below are the 3 different views offered with the Piper Tuni/dress, and can also be made sleeveless, that's a total of 27 looks, yes 27.


For more information and to see other versions of the Piper made by other testers, click on the aff link. Thank you Christina from WBM for a great design.

Saturday, August 25, 2018

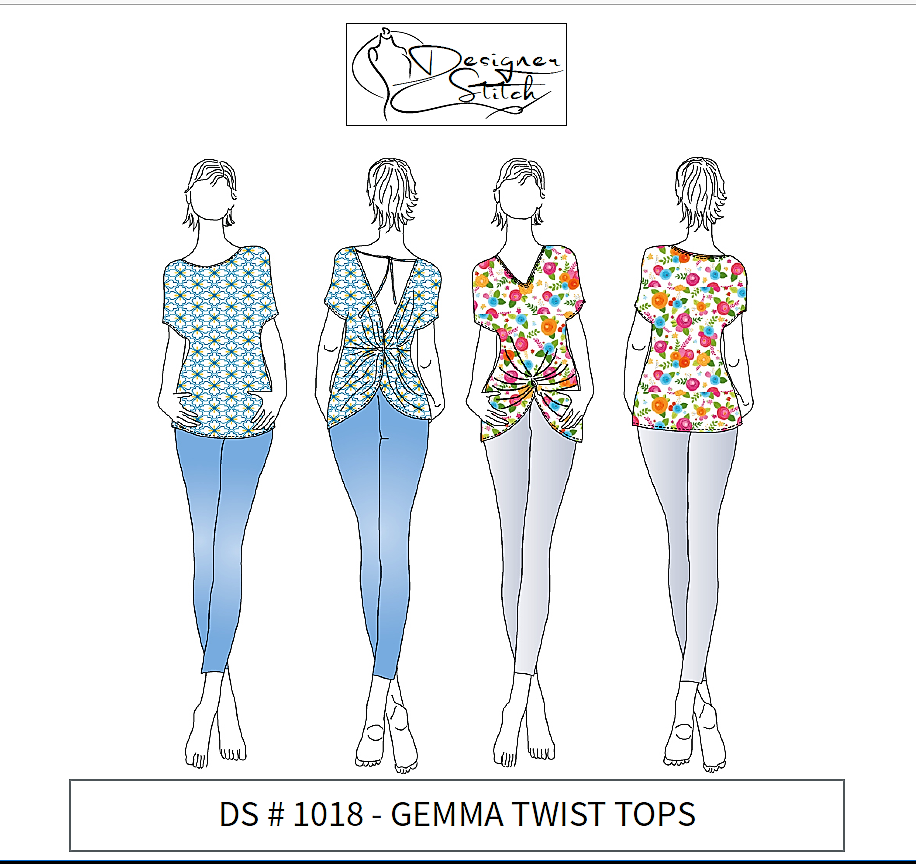
Designer Stitch Gemma Twist Top

Road Test for Designer Stitch Gemma Twist Top
In two versions, front knot and back knot


I first thought about showcasing this beautiful top by making collages, but it just didn't seam to capture the whole picture for me. So, I decided to do both collages and write a blog to show more pictures. The blog helps me write more information on my Gemma makes.

I fell in love with this top because I felt it was different and I needed some new tops. The Gemma is designed for knit fabric, but I also made the black out of a cotton woven fabric with no stretch. For the white front twist top I made it out of knit fabric. For the back twist top in black, I used a woven fabric because I knew that with the open back, it would be easy to slip on and I wanted to use a semi sheer fabric.

For the white with black stripes, I made the front knot version. I used a rayon/cotton/lycra blend. I found this fabric easy to work with when creating the front knot. The trick to creating the front knot or the back knot, is to follow the instructions step by step and not overthink it, as I did, lol (which took longer than it should have). I did sew a muslin first to assure proper fit and make any adjustments if needed.

I paired the white top with Shakti pants also from Designer Stitch, I just love the side ties on these pants. The Shakti pants come in many versions as well. For more information on the Gemma top and other patterns, click on the aff link, thank you.
Aff link, https://designerstitch.com/?affiliates=12


For the semi sheer black top, I used a cotton woven fabric for the back knot. I found the back knot version with the semi sheer fabric to be very elegant and sexy. I paired the black top with a pair of Alyse boot cut pants, also from Designer Stitch.


Thank you Ann Grose for another great design, one that I will make more of and wear for many different occasions.

I want to thank my friend, Orbey Eliazar for being my photographer for the photos, Thank you Orbey.

This blog contains an affiliate link, it helps with purchasing fabric so that I can continue to test and learn new sewing techniques from Ann Grose, of Designer Stitch.
https://designerstitch.com/?affiliates=12

Sunday, July 29, 2018

Designer Stitch, Shaktis pants.


 I had the pleasure of testing Designer Stitch, the Shaktis pant with it's many variations.


For the green pinstriped pants, I used light scuba fabric with great recovery. I made the side ruched with drawstrings with no pockets. I found the trick to turning the thin drawstrings was to use a narrow tube with a thin dowel, a turning tool if you will. I really love this style of knit pants.

For the blue tie dye pants below, I used a jersey spandex type fabric. I did the side ruched legs with ties. I had a little bit of fabric left and decided to self draft a matching top. It has been very hot in central California, whole outfit was very comfortable to wear. Received many compliments, individuals asking where I purchased my outfit. Of course I was proud to say I made the outfit.


Overall, I highly recommend this pdf pattern, the Shakti pants from Designer Stitch. It is not a difficult pattern to sew up. A muslin is highly recommended to obtain the best fit for your body. Following the steps to the pattern is also important for best results, (sometimes I find myself re-reading to make sure I didn't miss a step).


 OPTIONS


Ann Grose from Designer Stitch, is a fantastic designer, up to the latest fashions, and gives great attention to detail in her pdf patterns.

Click on the affiliate link for more information on the Shaktis pants and to purchase the pattern. Thank you.
http://designerstitch.com/?affiliates=12