Friday, December 13, 2019

MADISON ROAD TEST

Madison Color-Blocked Dress
a Designer Stitch Design
sewn by me.


I was hesitant to sewing a color-blocked dress. But, when Madison came out for testing, I knew I had to challenge myself and I am so happy with the results.

I sewed up my Madison version with the straight skirt option, 3/4 sleeves, and with the back exposed zipper. First time with color-blocking a dress and sewing with an exposed zipper. I used Ponte De Roma fabric. I found that a stable knit fabric works best with the color-blocking with the Madison.

Exposed Zipper


A few tips I found very helpful for me in the fitting, is to sew a muslin first. I needed to sew my dress at least a few times before I was satisfied with the overall fit. So there was a lot of un-picking, especially once the exposed zipper was set in. While I love the exposed zipper, for my next Madison I will make one without the zipper option using the circle skirt option.

Color-Blocked the sleeves

I love the Madison and the color-blocked options. 

The Madison comes with several sleeves options and two skirt options as well.

If you look at Pinterest you will see many options for color-blocked garments.


Looking forward to seeing your color-blocked Madison in the Designer Stitch Support Group.

Thank you, Ann Grose, once again for another Great/Modern design.
This blog contains aff links.


Wednesday, September 18, 2019

Designer Stitch Camilia Road Test.

Camilia Dress
a Designer Stitch design
sewn by Synthia


I am loving the Camilia dress. I enjoyed sewing this dress so I made 3 because I know they will be used often. While the design is the same, each of my 3 dresses are intended for a different purpose and made from 3 different fabric types. I love the way the Camilia hugs your body, giving any body type a figure flattering look. Comes in two dress lengths and 3 sleeves lengths.

My favorite Camilia dress is the first one I made in Red. I chose red because I had Holidays in mind for this upcoming season. The fabric I chose was in my fabric stash. It is a medium weight stretch fabric, it shines, and shows the front pleats very well. I made the 3/4" sleeve length and just past the knee.


Camilia dress #2


For the Camilia dress above, in pink/wine/black/white colors, I chose to use a medium weight Liverpool fabric. I love this fabric, very easy to sew and holds the pleats very well, comfortable to wear. I made this dress sleeveless and plan on using it while there are still a few summer weeks. This was my friend's favorite.

Dress #3


Dress #3 is more of a casual wear dress. I made dress #3 out of a medium weight jersey type fabric with great stretch and recovery. The key to having the pleats not droop, great recovery from whatever type of stretch fabric is used. I love how this dress feels on, very comfortable and figure flattering. I made the long sleeve version and comes just below the knee. This dress can be casual or dressy.

Thank you Ann Grose from Designer Stitch Designs, for another great design.

For more information, click on the aff link.

Tuesday, September 10, 2019

Allie Skirt Road Test

Allie skirt
by Synthia Lee Gerritson
a Designer Stitch design


I love to wear skirts but don't wear them often. I really enjoyed sewing up the Allie skirt with its many options. Shown above Is the grommet and leather tie-wrap version. I made this one out of lightweight denim and I paired it with the Eleni top with flared sleeves, also from Designer Stitch.

As with any other Designer Stitch design, sewing up a muslin for a proper fit is highly recommended, which I need to do myself. A tip for adding the grommets, strips of iron-on interfacing where the grommets will be placed is also a must to help stabilize the grommets and prevent the fabric from weakening.

I styled my Allie skirt both tucked in and tucked out for a more casual/Bohemian look. The Allie skirt can be dressed up or down.
For more information, click on the aff link.


I enjoyed testing and sewing garments for Designer Stitch because of the attention to detail, well-written patterns, and there is, for the most part, only 1 version to test. Well done Ann Grose.

The other versions and sizes to the woven Allie skirt are shown below.
Wrap front gathered with ties, D-rings with ties, Grommet with ties, and a button wrap front. 

I enjoyed testing and sewing garments for Designer Stitch because of the attention to detail, well-written instructions, and for the most part, there is only 1 version to test. Well done Ann Grose.

Thank you for reading this brief blog which includes aff links.

Friday, August 30, 2019

Greenstyle Creations Scarlet hack

Scarlet Slouchy Sweater 
A Hack by
Synthia Lee Gerritson

I love Fall and Winter clothing, maybe because I am always cold, lol.


For the Slouchy Sweater hack shown above, I used the Greenstyle Creation's Scarlet Swing dress. Anything with the cold shoulder styling is one of my favorites.

Tutorial
This is a brief tutorial on how I created the Slouchy Sweater hack from the Scarlet Swing dress.

#1 if you don't own the Scarlet Swing dress, you can purchase here,

#2 For fabric I used a lightweight sweater knit fabric, lightweight gave it more of a slouchy look. I used a fabric with a small fringe on the selvages. The fabric was purchased at Walmart last year. You don't need your sweater knit with fringe.


#3 Once you have printed your pattern, choose the length you want your sweater to be. Cut the back to your desired length, but for the front pattern piece, you'll cut it approx 8.5" longer than the back. I like my sweater to be just passed my bum, especially when wearing leggings.

#4 Once you have cut your back pattern the length you desire, set it aside as nothing further will be done for the hack. Take your front piece, which will be approx 8.5" longer than the back, place the front and back pattern pieces with the underarm seams together, mark the front even with the back, set aside the back piece. 

#5 For the front hack, where you placed your mark at the side seam, place another mark approx 7" across the front piece, and draw a straight line. Begin to cut the front pattern, cut straight across from side seam to the 7" mark, then begin to cut at a semi-circle, continue to cut towards the end length, leaving 1/2" wide which is for the 1/4" front seam on either side for ties. Now measure 12" from the front centerfold and make a notch, this is where you will cut on the fold. Cut the centerfold up to the 12" mark, you have now created your front ties.


#6 Follow the pattern instructions to complete your Scarlet. For the center cut, you made previously, you can fold and hem as well as your lower hem. You are finished with your tie front hack.

Accent hemming.
Because my sweater knit fabric had a fringe, I used this in place of my neck binding, I used it for the center cut, sleeves, and I used it for my hemming as well. I did a reverse binding so the fringe can show at the neck and center cut. To obtain the fringe, I cut 1 1/2" off the selvages of my fabric.


Thank you for reading this brief tutorial which contains aff links to help with buying fabric.


Friday, August 16, 2019

Remi Roadtest

Remi Dress/Top
sewn by Synthia L Gerritson
a Designer Stitch Design
a brief blog.


I was very happy to be a part of the Remi Roadtest. Here where I live, it has been very hot.  So, the Remi design came at a great time for summer wear. I was happy to sew up the Remi in the midi length version in rayon fabric.  I also made extra straps and crisscrossed them. Because the Remi is with thin straps, you'd probably want to wear a strapless bra. Or you can customize your Remi for wider straps to cover the bra straps.


During the testing phase of the Remi, I sewed the tunic version and experimented by hacking the original Remi and making a v-neck. I made the black v-neck Remi out of a peach skin fabric, feels very soft.


I also used double straps for the black Remi, I really like the look with double straps.


 I could explain briefly how I hacked for the v-neck. For my v-neck Remi, from the front bodice pattern, top edge, I measured from the centerfold, approximately 5" down and marked. I then began to cut the pattern at an angle starting at the mark I placed, slightly curving so that it's not a complete straight angle, cutting until I reached the top edge by the shoulder/neck edge, making sure to leave a 5/8" seam allowance at the top neck edge. I also adjusted the pattern front-facing, I adjusted to match the v-neck front. I then followed the pattern instructions to complete my Remi. The pic below shows a closer look at the v-neck.


Thank you, DS for another great design.
This blog contains aff links.
http://designerstitch.com/?affiliates=12


Monday, June 24, 2019

GreenStyleCreations, June makes.

Staple Tank, Inspire Tights,
paired with the Clara wrap sweater.
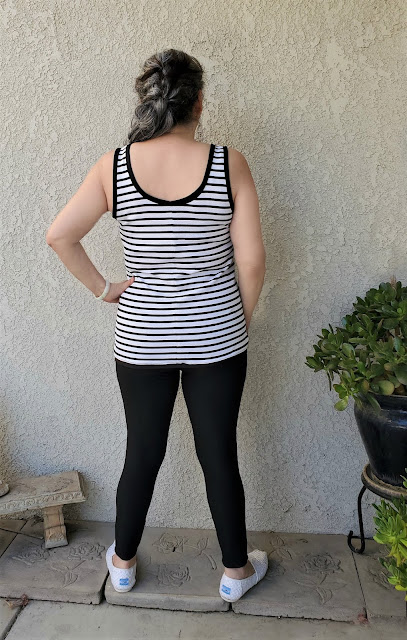


I decided to sew up an outfit that could transition from Summer to Fall. For my outfit I used the Staple Tank and the Inspire Tights for a Summer look. I used the binding method for the neck and arms, and added 1 1/2" to the length to cover my back side when I wear leggings or tights. I can't say enough about how much I truly enjoyed the fit and style of the Staple Tank. I have made many tanks, this one is the most comfortable to wear.


I am not knocking legging or tights out there, but the Inspire tights were such an easy sew and great fit. I didn't have to shorten the length of the pattern in anyway, I did do my usual grading to fit. The one thing I did do to the Inspire tights, because I love a higher waist band, I hacked the Inspires with the waist band from the Chelsea pants, I just love the fit and comfort of this waist band, I feel I get a little belly support too. I also added the optional gusset, so comfortable to have. This was the first time sewing up the Inspires, even though I have owned the pattern for years. I am so glad I did because I now have a great pair of tights/leggings pattern to use over and over. I only wish I could remember the fabric I used or where I purchased it. 


To transition to Fall with my Inspire and Staple Tank, I paired the outfit with the Clara Wrap Sweater, I love the whole look and fit of all 3 garment pieces. I love this wrap sweater, I have made 4 of them already, I like to pair this wrap with just about every thing, I especially like to use them for dance class.


There was a lot of comfort in sitting with the Inspires. My dogs thought that when I was sitting, it was lap time for them, they ran to be on my lap, lol.


You can pick up the Inspire tights and the Staple Tank on sale for the month of June. Click on the aff. link for more information, thank you.
https://greenstylecreations.refersion.com/c/455617


Saturday, June 22, 2019

Callie Pinafore Road Test

Callie Pinafore Dress a
Designer Stitch Design
(an ageless dress)


One of the joys of testing for designers, you have the opportunity to think outside the box and challenge yourself to sew something you wouldn't normally ever wear. Callie is a design for all ages and for various woven fabrics.
https://designerstitch.com/shop/callie-pinafore-dress/?affiliates=12


I had the opportunity to sew up the Callie Pinafore Dress, I didn't think I would be into wearing a pinafore dress, but I love the style and the fit of the Callie. The Callie to me is a more modern version of the old pinafore dress, with many versions to choose from. I choose the racer back for a more modern and edgy look.


I made my Callie out of a light weight woven denim fabric. I used bronze connectors for the straps as well as bronze rivets, and sewed a slight contrast top stitching. I needed to sew up a muslin first to get the proper fit, glad I did. I am very happy with the final result and I already wore it out, I was even asked where did I buy my Pinafore dress. My friend was impressed with the Callie's fit and design.


As usual, Ann Grose from Designer Stitch,"knows best", when it comes to knowing what looks great. Thanks Ann

For more information, click on the aff link.
https://designerstitch.com/shop/callie-pinafore-dress/?affiliates=12

A little more about why I chose to join the Callie Road Test. (My own insert from the Designer Stitch site)

"My name is Synthia, I enjoyed sewing up the Callie Pinafore dress because I have never worn a dress like this. The beauty of testing, gets one to step outside the box. I sewed up the racer back Callie with back pockets and one bodice pocket. I chose the racer back for a more modern/edgy look. I decided to use a light weight denim fabric, I used bronzed colored rivets, and connectors for the straps. The Callie is not a fast sew, you must sew a muslin first, a must. Also, sew your top stitching very slow, it won't be perfect, but one must strive for it for a nice finished look, and iron...iron...iron, as you go, to avoid a home made look. I wore my Callie out and was asked where did I purchase it, my friend really liked the final look and fit. Thanks Ann Grose".

Synthia L Gerritson